

Starfield Navigation guide refers to the process of navigating through the expansive Starfield universe using in-game tools like the star map, compass, and quest markers.
In the vast expanse of the Starfield universe, navigating through the stars is both a necessity and an art. Constellation explorers, like you, need to harness the power of the star map, compass, and markers to traverse the galactic system efficiently. In this guide, we’ll walk you through the intricacies of using these essential tools, ensuring that you become a master navigator in Starfield. Make sure you read our Starfield Navigation Guide till the end.
Starfield Navigation Guide: Starfield Map
To embark on your celestial journey, the first step is to open the Starfield map. Here’s how you can do it:
- Accessing the Starmap: Start by selecting ‘Starmap,’ located in the top left corner of your in-game menu.
- Xbox Users: If you’re playing on Xbox, you’ll need to hold the left stick on the Starmap and press ‘A’ to dive into the map.
- Initial Information: Before you make any selections, take a moment to observe the information displayed. It provides details about your current planet, the time, and your surveyed progress.
How to use the Starfield Map
Once you’ve accessed the map, understanding how to use it effectively is crucial. Here’s a step-by-step guide:
1. Zooming In and Out
- Zoom In: You’ll initially see your current destination on the map. To zoom out to the System or Galaxy view, press the ‘B’ button.
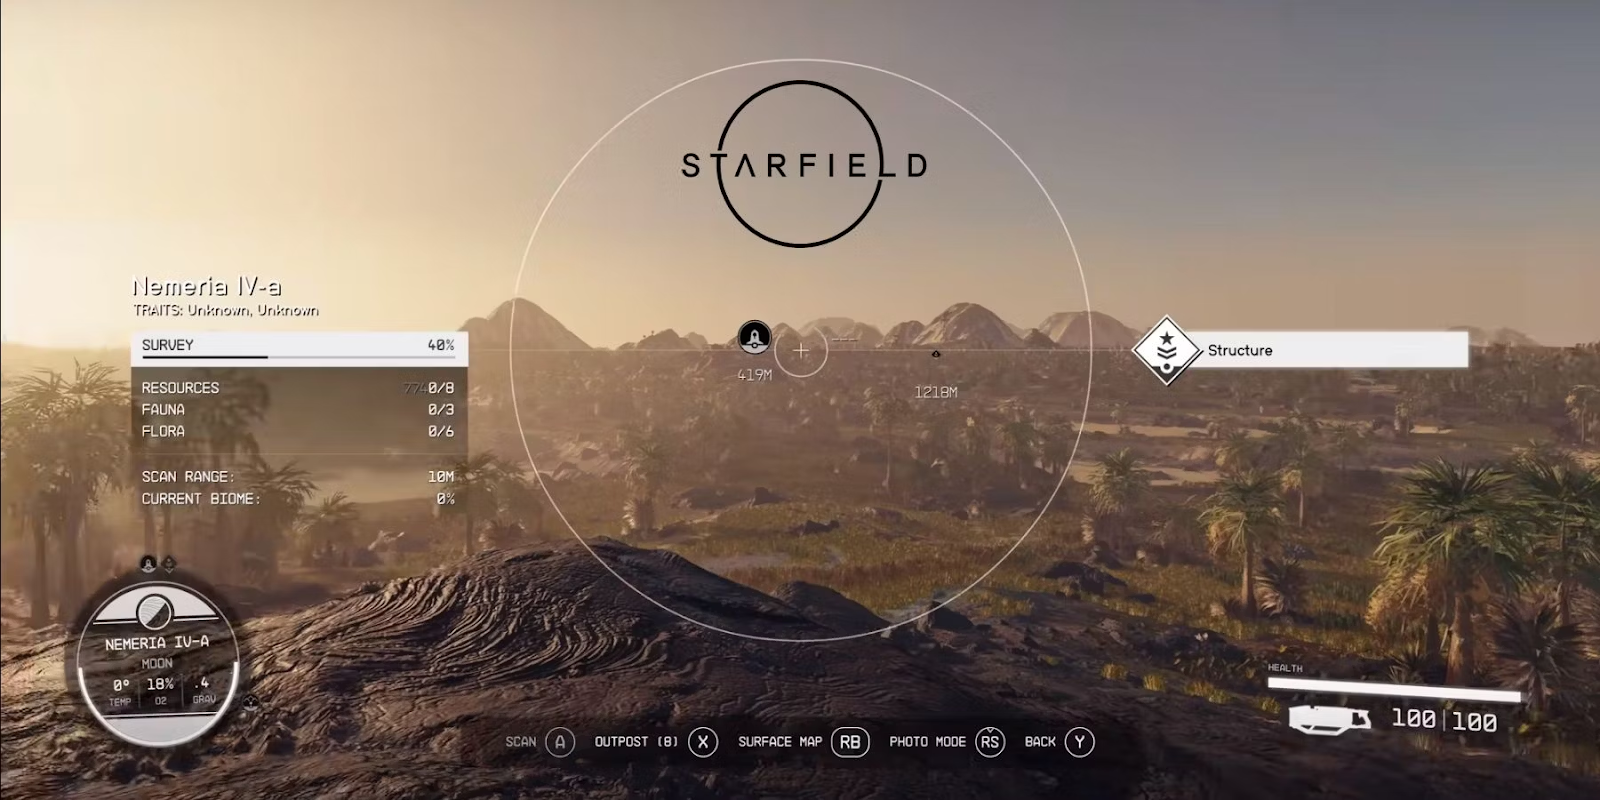
2. Surface Map
- Landing Target: In the first section of the Starmap, you can set a landing target for your journey.
- Exploration: Here, you’ll find valuable information about the planet’s attributes, helping you decide if it’s worth visiting. You can also view its collectible resources by selecting ‘LB.’
- Selecting a Destination: To choose a landing destination, use the ‘A’ button to select the area and then hold down ‘X’ to begin your expedition.
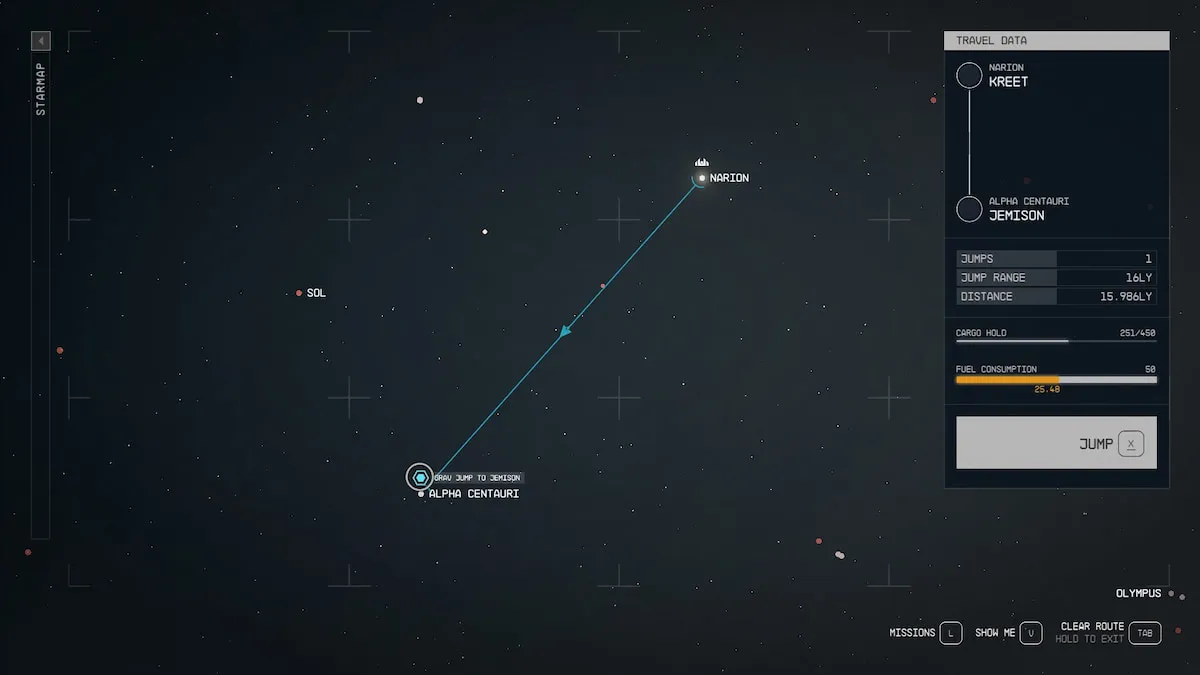
3. System and Galaxy View
- System View: Press ‘B’ again to switch to the System view, displaying every planet in the current solar system.
- Galaxy View: This view is primarily used for long-distance travel, allowing you to travel from system to system. Each area will have a level recommendation, so check your character’s status before embarking on such journeys.
- Gravity Jump: For longer distances, consider boosting your Gravity level to initiate a Gravity Jump.
- Setting Custom Waypoints: Press ‘A’ anywhere on the map to set custom waypoints, which can be removed using the same interaction. Revisiting areas unlocks the fast travel option, significantly expediting your travels.
Exiting the Starfield Map
Exiting the map is as essential as using it. To do so, follow these steps:
- Hold ‘B’ Button: Simply hold the ‘B’ button to exit the map and return to the in-game menu.
- Continuous Press: Alternatively, you can continuously press ‘B’ to gradually zoom out your perspective until you reach the last page.
Starfield Navigation Guide: Compass
The compass is your trusty guide in Starfield, highlighting critical information. Here’s what you need to know about it:
- Objective Highlight: Your current objective is marked with a light blue hexagon on the edge of your screen and on the bottom-left compass.
- Enemy Locations: Enemies are displayed on the compass with a red arrow, indicating their positions.
- Orientation and Location: The compass also indicates the direction you’re facing and your current location.
- Additional Stats: In certain cases, the compass can display essential details like the planet’s Gravity and Oxygen levels.
Starfield Navigation Guide: Quest Marker
Quest markers are indispensable in your adventure. They point you toward your objectives and sometimes even to new areas. Here’s how to make the most of them:
- Use the Hand Scanner: Enable a breadcrumb navigation guide on the floor by using the Hand Scanner. This is particularly useful when navigating complex locations.
- Details on Quest Marker: Point your Hand Scanner at a quest marker to reveal objective details, making it easier to track your quests, especially when dealing with multiple markers.
Managing Your Quests
Efficient quest management is essential. Here’s how to do it effectively:
- Changing Tracked Quests: From the Missions Menu (accessed by pressing ‘L’), select the quest you want to track. Click on the mission’s current objective below the questline’s general objective. The currently tracked questline will be indicated by a blue bar.
- Tracking Multiple Quests: In the Missions Menu, you can also choose to display multiple quest markers that are close to your location by pressing ‘V.’
Troubleshooting Quest Marker Issues
Sometimes, quest markers can be finicky. If you encounter issues, consider these quick fixes:
- Reselect a Target Quest: If you lose a quest marker, try selecting a new quest to target, regardless of the cause.
- Fast Travel or Change Areas: In rare cases, going through a load screen can reset certain game elements, potentially resolving quest marker problems.
- Quick-Save and Quick-Load: Similar to fast traveling, quick-saving and quick-loading can provide a reset for backend game systems.
FAQs
To access the Starfield map, simply open the in-game menu and select ‘Starmap.’ If you’re playing on an Xbox, you can access it by holding the left stick on the Starmap and pressing ‘A.’
The Compass in Starfield serves as your guide, highlighting your current objective, displaying enemy locations, showing your orientation, and providing essential information about your location, such as Gravity and Oxygen levels. It’s a crucial tool for staying on course during your adventures in the game.
For more related content check out our dedicated website Gamition.
More E-Sports news:
- How To Beat Ecliptic Mercenary In Starfield
- How To Join Factions In Starfield
- Starfield Looting Guide – Best Spots For Farming Items
Follow our dedicated E-Sports page for instant